


Door seal replacement is essential for vehicle energy efficiency and structural integrity, preventing air/water leaks via rubber/silicone gaskets. Older cars often require replacement due to brittle or worn-out seals, while newer models may have issues from body repairs. Choosing correct OEM or aftermarket parts tailored to vehicle model and regional weather conditions ensures optimal fit and performance for both safety and fuel efficiency. Regular inspection and timely replacement are key for maintaining vehicle protection against environmental damage.
Looking to upgrade your vehicle’s interior comfort and protect against exterior elements? Door seal replacement is a straightforward DIY project that can dramatically improve both noise levels and energy efficiency. This guide covers everything you need to know, from identifying common door seal issues to selecting the right replacements for older or newer models. Learn how to install new seals effortlessly with our step-by-step instructions.
- Understanding Door Seals: Their Role and Common Issues
- Choosing the Right Replacement Seals for Your Vehicle
- Step-by-Step Guide to Installing New Door Seals Effortlessly
Understanding Door Seals: Their Role and Common Issues
Door seals play a crucial role in maintaining the integrity and energy efficiency of your vehicle. These rubber or silicone gaskets form a tight seal between doors and their frames, preventing air leaks and water intrusion. This is particularly important for older vehicles where original door seals may have become brittle or worn out over time, leading to increased heating and cooling costs. Even newer models can experience issues with door seals, especially if they’ve been involved in fender repairs or car body repairs, causing them to lose their flexibility and effectiveness.
Common problems associated with door seals include cracking, tearing, or becoming compressed, which can be attributed to extreme weather conditions, frequent opening and closing, or mishandling during autobody repairs. A damaged door seal not only compromises the vehicle’s fuel efficiency but also affects its overall performance and comfort levels. Recognizing these issues is essential for timely door seal replacement, ensuring your car remains a reliable mode of transportation without any unwanted leaks or drafts.
Choosing the Right Replacement Seals for Your Vehicle

When it comes to door seal replacement, choosing the right components is paramount for a successful and long-lasting repair. Different vehicle models have unique specifications, so selecting seals that are an exact match for your make and model is crucial. Many auto collision centers offer a range of options, from generic to manufacturer-specific parts. For older vehicles, original equipment manufacturer (OEM) seals can ensure optimal fit and performance, while newer models might benefit from high-quality aftermarket alternatives that often come with advanced features.
Consider factors such as weather conditions in your region and the specific needs of your car’s bodywork services. Waterproof and weatherstrip seals are essential for preventing moisture intrusion, especially if you live in an area prone to rain or snow. Additionally, if you frequently drive in harsh environments, durable seals that can withstand wear and tear will be more suitable. Remember, a door seal replacement is not just about aesthetics; it contributes to your vehicle’s overall safety, particularly regarding auto glass replacement, by maintaining proper sealing for optimal air pressure and structural integrity.
Step-by-Step Guide to Installing New Door Seals Effortlessly

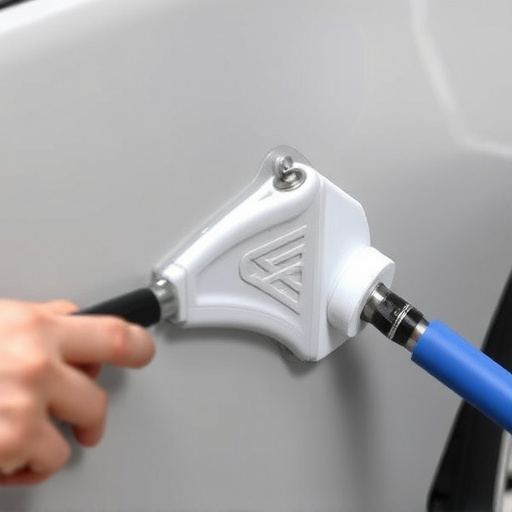
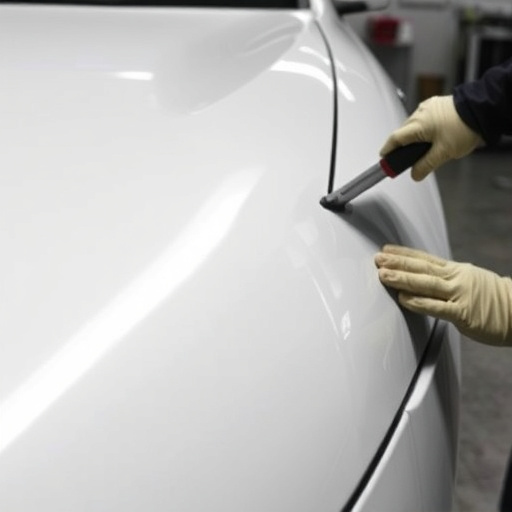
Replacing door seals on your vehicle is an essential part of routine auto maintenance, whether for older models or newer ones. Here’s a straightforward, step-by-step guide to ensure the process is hassle-free and effective. Begin by identifying the specific door seal parts that require replacement using the vehicle’s service manual or consulting with a professional at a reliable collision center or autobody repairs shop. Once you’ve gathered all necessary tools and parts, prepare your workspace: park the car on a level surface, engage the parking brake, and remove any personal items from the immediate area to ensure safety and accessibility.
Next, deflate any existing door seals using a suitable tool to create space for removal. Carefully disengage the old door seals from their hinges and fixings, taking note of their orientation for proper reinstallation later. After removing all seal components, clean the door frame thoroughly to eliminate any debris or residue that could interfere with new seals’ effectiveness. Insert the new door seals, ensuring they are aligned correctly and secure them in place using specified hardware. Inflate the seals to their recommended pressure for a snug fit, completing the door seal replacement process. Regularly inspect door seals as part of your auto repair services routine to maintain optimal vehicle performance and protect against environmental elements.
Door seal replacement is a straightforward yet impactful process that can enhance your vehicle’s performance and longevity. By understanding the role of door seals, identifying common issues, and choosing the right replacements, you can ensure better energy efficiency, reduced noise, and improved overall driving experience. With the right tools and a step-by-step guide, installing new door seals becomes an effortless task, allowing you to navigate your vehicle’s maintenance with confidence.